Terraform Providers: Authenticate and Configure To Deploy Your Resources

Aspiring DevOps Engineer, Certified AWS Solutions Architect - Associate
TerraWeek Day 6/7
Learn about Terraform providers and compare their features across different cloud platforms--->
Terraform providers and their significance in managing resources across various cloud platforms or infrastructure services.
Terraform Providers are plugins that enable interaction between Terraform tools and external API services for cloud infrastructure management. They define the set of resources and APIs supported by a cloud platform.
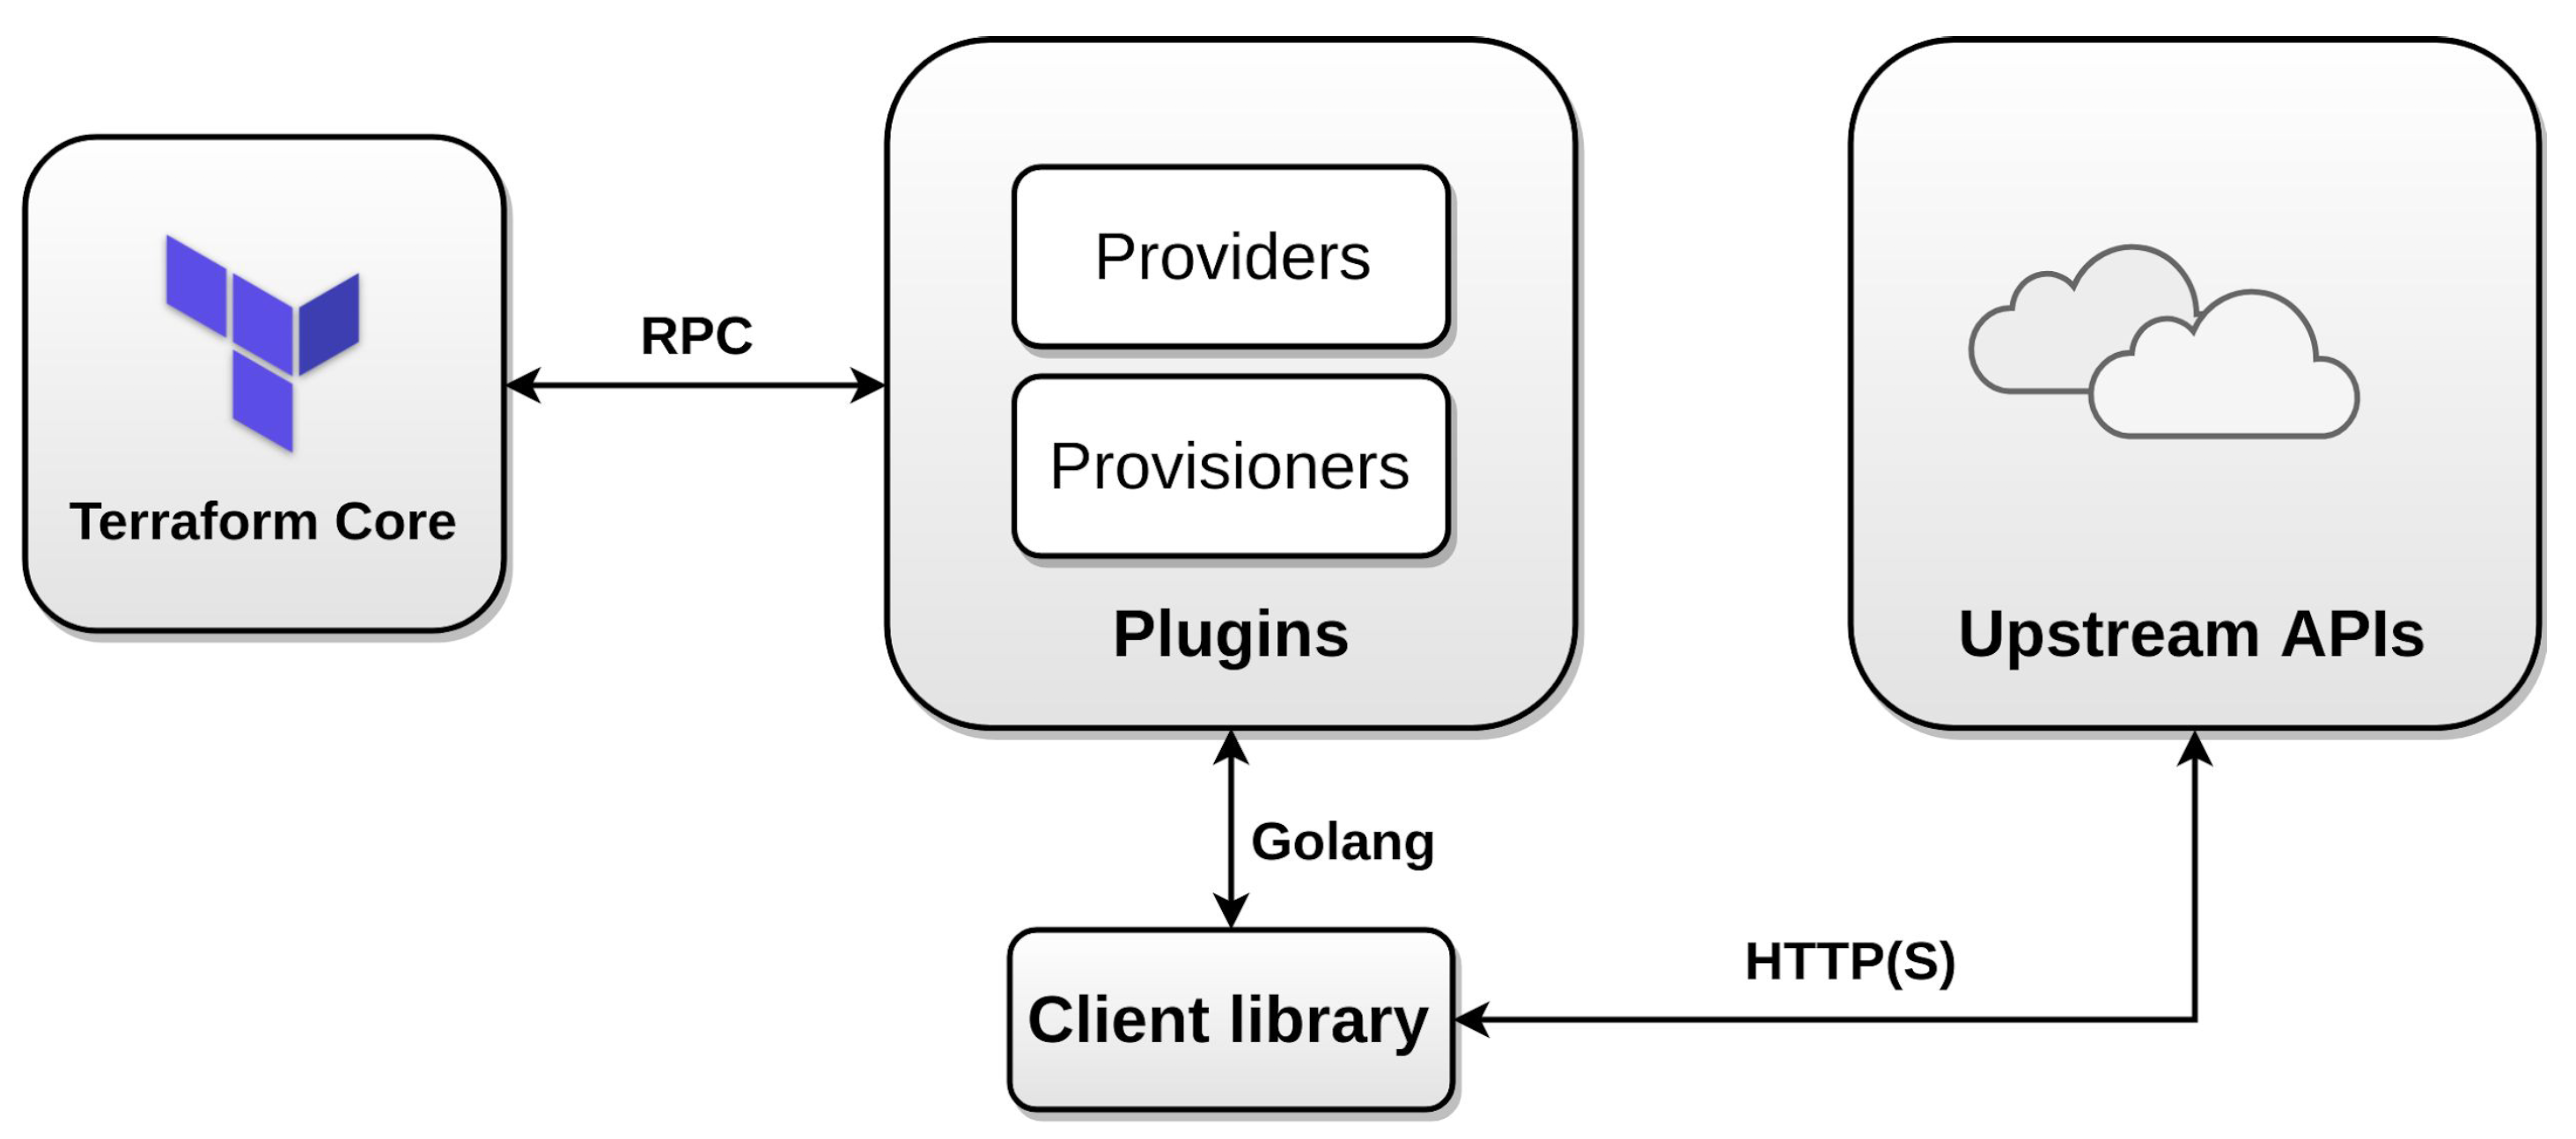
Terraform Providers are essential for managing infrastructure for different cloud platforms like AWS, Azure, Google Cloud, and many more..
There are almost 3268 terraform providers available as of now including providers from official, partner and community.
Compare the features and supported resources for each cloud platform's Terraform provider to gain a better understanding of their capabilities.
Some key features of Terraform Providers:
They enable infrastructure configuration for cloud platforms
They simplify the process of creating, updating, and deleting resources on cloud platforms
They provide a unified language for managing different cloud platforms
They allow for the use of third-party Terraform providers
Each cloud provider's Terraform Provider has its set of resources and features. Let's compare features for AWS, Azure, and Google Cloud Providers.
| AWS | Azure | GCP |
| Supports up to 512 resources and data sources | Supports over 500 resources and data sources | Supports over 100 Google Cloud Platform (GCP) services and resources |
| Supports various AWS services like EC2, VPC, ELB, S3, and RDS | Supports various Azure services like Virtual Machines (VMs), Virtual Networks (VNets), SaaS applications, and more. | Supports GCP services like Compute Engine, Kubernetes Engine, IAM, Pub/Sub, and more |
| Supports different authentication methods like static credentials, environment variables, and EC2 instance profiles | Supports different authentication methods like Azure CLI, Service Principal, Managed Identity, and environment variables | Supports authentication using Google Cloud default credentials, service account JSON file |
| Includes AWS-specific features like IAM role and policy management, VPC peering, Route 53 DNS configuration, SNS topic creation, and CloudFormation stack import | Offers integration with various Azure services, such as Azure Container Instances, Azure Kubernetes Service (AKS), Azure Functions, Azure Active Directory (AAD), Azure Monitor, and Azure Policy | Supports creating and managing IAM roles and service accounts in Google Cloud, allowing you to control access and permissions for resources |
| Has a large and active community, providing numerous community-maintained modules and resources for managing AWS infrastructure using Terraform | Support for deploying and managing Azure Managed Applications, allowing you to package and distribute applications as self-contained Terraform modules | Compatible with Google Cloud Deployment Manager, allowing you to import existing Deployment Manager templates or migrate from Deployment Manager to Terraform |
Explore provider configuration and set up authentication for each provider.
Provider configuration and authentication mechanisms in Terraform.
To configure a provider, we must specify its name and the authentication credentials for the platform it represents. There are several authentication mechanisms for each provider, which we must set up before we can use them. The following examples use AWS, but the mechanisms and processes for other providers are similar.
Configuring Providers
To configure a provider, we declare a provider block in our Terraform configuration file. Below is an example provider block for AWS on us-east-1 region:
provider "aws" {
  region = "us-east-1"
}
This block declares a provider named aws and sets its region to us-east-1.
Authentication Mechanisms for AWS
Here are the authentication mechanisms that we can use to authenticate on AWS:
Access keys are access and secret keys which can be used to access and manage AWS resources. It is recommended to use environment variables or configuration files rather than hardcoding the access keys in the provider block.
- Set environment variables
export AWS_ACCESS_KEY_ID="access-key"
export AWS_SECRET_ACCESS_KEY="secret-key"
In the provider block, we can reference the environment variables:
provider "aws" {
  region = "us-east-1"
  access_key = "${var.AWS_ACCESS_KEY_ID}"
  secret_key = "${var.AWS_SECRET_ACCESS_KEY}"
}
- Use configuration files:
AWS CLI configuration files are located at ~/.aws/credentials. We can reference the access keys in our provider block by specifying the path to the file:
provider "aws" {
  region = "us-east-1"
  shared_credentials_file = "/path/to/aws/credentials/file"
  profile = "profile-name"
}
Authentication Mechanisms for Azure
Similar to AWS, Azure also has various authentication mechanisms to authenticate Terraform. Here are the authentication mechanisms that we can use to authenticate on Azure:
- Azure AD Service Principal:
Azure Active Directory (AAD) service principals are a way to authenticate applications and services so they can access Azure resources. When creating a service principal, we must create a client ID and secret.
To authenticate Terraform with Azure AD service principal, we need to specify the client_id and client_secret in the provider block. Here's an example of how to declare an Azure provider using a service principal:
provider "azurerm" {
  subscription_id = "12345678-1234-1234-1234-1234567890ab"
  client_id       = "87654321-4321-4321-4321-ba0987654321"
  client_secret   = "my-client-secret"
  tenant_id       = "11111111-1111-1111-1111-111111111111"
}
- Managed Service Identity (MSI):
Managed service identity (MSI) is a feature enabled on Azure services that provide an automatically managed identity for the resources deployed and access to Azure resources. When using an MSI-enabled resource, we can authenticate to Azure resources without the need for managing secrets.
To authenticate Terraform with Azure MSI, we need to specify the identity attribute in the provider block. Here's an example of how to declare an Azure provider using MSI:
provider "azurerm" {
  subscription_id = "12345678-1234-1234-1234-1234567890ab"
  identity = {
    type = "systemAssigned"
  }
}
- Azure CLI:
Terraform can use the credentials stored in the Azure CLI to authenticate to Azure resources. To use the Azure CLI, we only need to declare the provider block without any authentication credentials.
Here's an example of how to declare an Azure provider that uses the Azure CLI for authentication:
provider "azurerm" {}
Authentication Mechanisms for GCP
- Using Service Account Key file for Authentication:
provider "google" {
  credentials = file("/path/to/your/service-account-key.json")
  project     = "my-project-id"
  region      = "us-central1"
}
In this approach, you can authenticate using a service account key file, which you can create or obtain from the Google Cloud Console. Once you have the key file, you can configure the Google Cloud Platform provider to use that file using the credentials parameter, with the file path and name as the value.
- Using Application Default Credentials (ADC) for Authentication:
provider "google" {
  credentials = "application_default"
  project     = "my-project-id"
  region      = "us-central1"
}
In this approach, the GCP provider uses the application_default_credentials method to authenticate the Terraform script with Google Cloud. This method uses your local application default credentials, which are obtained using the same authentication flow as the Google Cloud SDK and other Google Cloud client libraries.
- Using Environment Variables for Authentication:
provider "google" {
  credentials = "env:GOOGLE_APPLICATION_CREDENTIALS"
  project     = "my-project-id"
  region      = "us-central1"
}
In this approach, you can authenticate using environment variables that specify the path to a service account key file. The credentials parameter value is set to env: GOOGLE_APPLICATION_CREDENTIALS and the path to the service account key file is set in the environment variable GOOGLE_APPLICATION_CREDENTIALS.
- Using the Metadata Server for Authentication (Google Compute Engine VM Only):
provider "google" {
  credentials = "metadata"
  project     = "my-project-id"
  region      = "us-central1"
}
In this approach, you can authenticate using the instance's built-in metadata server. With this method, instances can authenticate themselves and access resources on behalf of the service account attached to that instance.
Set up authentication for each provider on your local machine to establish the necessary credentials for interaction with the respective cloud platforms.
Set up the authentication for AWS, Azure, and GCP--->
AWS:
Create an AWS account if you do not have one already.
https://repost.aws/knowledge-center/create-and-activate-aws-account
Create an IAM user with programmatic access and attach the necessary permissions to access and manipulate your AWS resources.
Create an access key and secret key for the IAM user and note them down.
Export the AWS access key and secret key as environment variables.
For Linux and macOS, you can do this by executing the following commands, replacing the values with your access key and secret key:
export AWS_ACCESS_KEY_ID="your_aws_access_key"
export AWS_SECRET_ACCESS_KEY="your_aws_secret_key"
For Windows, you can do this by executing the following commands, replacing the values with your access key and secret key:
setx AWS_ACCESS_KEY_ID YOUR_ACCESS_KEY_ID
setx AWS_SECRET_ACCESS_KEY YOUR_SECRET_ACCESS_KEY
Azure:
- Create an Azure account if you do not have one already.
Create a service principal with the necessary permissions to access and manipulate your Azure resources.
Note down the Azure subscription ID, client ID (also known as application ID), client secret (also known as password), and tenant ID.
Export the Azure subscription ID, client ID, client secret, and tenant ID as environment variables. For Linux and macOS, you can do this by adding the following lines to your .bashrc or .bash_profile file, replacing the values with your own subscription ID, client ID, client secret, and tenant ID:
export ARM_SUBSCRIPTION_ID="your_subscription_id"
export ARM_CLIENT_ID="your_client_id"
export ARM_CLIENT_SECRET="your_client_secret"
export ARM_TENANT_ID="your_tenant_id"
GCP:
Create a GCP account if you do not have one already.
Set up the appropriate permissions to access and manipulate your GCP resources.
Create a new service account key and note down the downloaded key file's path.
Export the GCP service account key as an environment variable. For Linux and macOS, you can do this by running the following command, replacing the path/to/service-account-key.json with the actual path and filename of your service account key file:
export GOOGLE_CREDENTIALS=$(cat path/to/service-account-key.json)
Or
With your environment variables set up, you can now use Terraform to provision and manage your AWS, Azure, or GCP resources.
Let's have Hands-on experience using Terraform providers for your chosen cloud platform.
Choose a cloud platform (AWS, Azure, Google Cloud, or others) as your target provider for this task.
Create a Terraform configuration file named main.tf and configure the chosen provider within it.
Configuration file to create an aws_security_group on AWS.
terraform {
  required_providers {
    aws = {
      source  = "hashicorp/aws"
      version = "~> 4.16"
    }
  }
  required_version = "~> 1.3.9"
}

provider "aws" {
  region = "us-east-1"
}

resource "aws_security_group" "main" {
  egress = [
    {
      cidr_blocks      = [ "0.0.0.0/0" ]
      description      = ""
      from_port        = 0
      ipv6_cidr_blocks = []
      prefix_list_ids  = []
      protocol         = "-1"
      security_groups  = []
      self             = false
      to_port          = 0
    }
  ]
  ingress = [
    {
      cidr_blocks      = ["0.0.0.0/0"]
      description      = ""
      from_port        = 22
      ipv6_cidr_blocks = []
      prefix_list_ids  = []
      protocol         = "tcp"
      security_groups  = []
      self             = false
      to_port          = 22
    },
    {
      cidr_blocks      = ["0.0.0.0/0"]
      description      = ""
      from_port        = 80
      ipv6_cidr_blocks = []
      prefix_list_ids  = []
      protocol         = "tcp"
      security_groups  = []
      self             = false
      to_port          = 80
    }
  ]

  tags = { Name = "Terraform_Generated" }
}
Authenticate with the chosen cloud platform using the appropriate authentication method (e.g., access keys, service principals, or application default credentials).
Deploy a simple resource using the chosen provider. For example, if using AWS, you could provision aws_security_group.
Experiment with updating the resource configuration in your main.tf file and apply the changes using Terraform.
Observe how Terraform intelligently manages the resource changes.
Once you are done experimenting, use the terraform destroy command to clean up and remove the created resources.
Summary:
Today, We learned about Providers in Terraform, their benefits, Authentication methods, configuration and deployments. Providers are a powerful feature in Terraform that simplifies the process of creating, updating, and deleting resources on cloud platforms
Keep exploring and experimenting with Terraform providers to build your infrastructure on multi-cloud platforms. Happy learning! 😊
#TrainWithShubham #TerraWeek Challenge
I hope you learned something today with me!

Stay tuned for my next blog on "Day7 of Terraweek Challenge". I will keep sharing my learnings and knowledge here with you.
Let's learn together! I appreciate any comments or suggestions you may have to improve my learning and blog content.
Thank you,
Chaitannyaa Gaikwad


